Blog
In this inaugural post I walk through the decision making that informed the design of this site (which tools and technologies I used), and the steps to set it all up.
📌 TL;DR
This site is
- hosted on Firebase
- created using Hugo
- has a custom domain purchased on Google Domains
- Built following these steps
Lessons / Key takeaways
Start projects with a goal, list of requirements and constraints. Then consider the options before starting on any work. |
|
This site is hosted on Firebase |
|
The content is generated using Hugo |
|
Planning the build
I followed these steps to get this site up:
- Start with a goal, and list of requirements and constraints
- Generate the site content
- Find a host and custom domain
First: Goals, requirements, and constraints
TL;DR If you want to focus on writing, there is no need to set up your own site. Go with Medium, which is the best free-to-post site IMO.
I had intended to learn some FE basics + start writing this year. Setting up this blog allowed me to peel two potatoes at the same time (cruelty free figures of speech only on this site :bird: :bird:)
Goals
- Find a place to host my writing
- Learn HTML, Javascript, and CSS basics
- Host in a place that allows me to link to github projects
- Stretch: Run code from the site itself
Non-goals
- Build a dynamic site (…yet) / build anything that would necessitate a database
Requirements
- I’m new to front end development, so I need something that comes with a framework I can tinker with as opposed to building something from scratch
- The framework should come with an active community so that I can find support as needed
- I am not interested in opening my home network to the internet, so I’d like to host on a third party platform
- Preferably a free-to-host platform
Constraints
- Time: My primary goal is to have a place to write, but my secondary goal is having a sandbox to explore and configure a site. A tension arises here as the tinkering pulls time out of writing, and vice versa.
Second, generate the content
TL;DR I chose Hugo because it had the most active community for support and it’s written in Go which is a language I wanted to pick up anyway.
I went on the hunt for static content generators, which are tools to create the html, css, and javascript that would become my site. In doing so, I found a new requirement that the site be tolerable aesthetically so a generator with an active community and support for themes was added to my list from the requirements step.
I found this great list of site generators, from there I narrowed down to a few options based on the technologies used as well as the communities supporting the tooling:
| Site Content Options | Description | Comments |
| Eleventy | Open sourced Javascript static site generator |
|
| Next.js | Minimalist Jamstack framework using Javascript, typescript, and rust.
Objective is to build scalable React web apps (static, dynamic) |
|
| Hugo | Written in Go
General purpose static site framework |
|
I went with Hugo, because it offered a quick setup with plenty of room for tinkering after the initialization. It’s also written in Go which makes site building fast for quick prototyping down the road.
Third, finding a host
TL;DR I went with Firebase which offers trivial custom domain setup along with a free tier that offers plenty of headroom for the traffic and site content I plan to create.
I considered the following for hosting - I initially published to GitHub Pages; which seemingly offered the fastest time-to-deployment since my source was in a public repo anyway, but switched to Firebase after configuring my custom domain. Firebase, I found, offered the most runway for continued development beyond static content only (no concrete plans here, but the optionality is valuable).
| Host Options | Description | Comments |
| Netlify | Serverless Jamstack platform. Free tier up to 300 build minutes per month. |
|
| Github Pages | Git repo hosting service that may run the files through a jekyll build process.
Soft build limit (10/hour), and site size (1gb served, 100gb bandwidth) |
|
| Firebase | App and rich site development platform, offers automated backend services and a suite of features for release and app measurement. Has a free tier also |
|
NOTE: Not an exhaustive list, see more complete list here.
Finally, getting a neat custom domain
Pricing was a wash and there is no differentiator in the product offering itself (no matter the seller, you’re getting the same domain!) I went with Google Domains because when adding the custom domain in Firebase, if purchased from Google Domains then the ownership proof is done automatically which will save some time and implementation compleixty.
NOTE: GitHub Pages threw an error when I tried to reconfigure the build to my custom domain, so I chose to relocate my site to Firebase at this point.
Building it
I will skip steps for hosting on GitHub Pages, which can otherwise be found here, and provide the steps I followed to host on Firebase (including setting up my custom domain name on Google Domains)
Prerequisites: Git, Hugo, and Node.js
brew install git
brew install hugo
brew install node
Setup a Github repo for the site
-
Create a repo with the naming convention [username].github.io
- I left “main” as the source for Hugo build and created a separate branch for the site called
gh-pages
NOTE: this was initially for the github pages deployment, but I kept the naming convention.
- I left “main” as the source for Hugo build and created a separate branch for the site called
-
Clone the github repo locally.
- you’ll want to be working locally from the
mainbranch
- you’ll want to be working locally from the
-
Initialize Hugo in your cloned repo.
hugo new site [username].github.io/
cd [username].github.io/
-
Picking a theme requires downloading & updating the config file. I am using PaperMod
NOTE: PaperMod instructions use a YAML based Hugo build but I kept TOML. You can find YAML → TOML translators online. A sample YAML config for PaperMod is here
git clone https://github.com/adityatelange/hugo-PaperMod themes/PaperMod --depth=1
- configure only the contents of ./public/* (the built site) to push to the
gh-pagesbranch
mkdir .github/ .github/workflows
touch .github/workflows/
Add the following content to that file:
name: github pages

on:
  push:
    branches:
      - main  # Set a branch to deploy
  pull_request:

jobs:
  deploy:
    runs-on: ubuntu-22.04
    steps:
      - uses: actions/checkout@v3
        with:
          submodules: true  # Fetch Hugo themes (true OR recursive)
          fetch-depth: 0    # Fetch all history for .GitInfo and .Lastmod

      - name: Setup Hugo
        uses: peaceiris/actions-hugo@v2
        with:
          hugo-version: 'latest'
          # extended: true

      - name: Build
        run: hugo --minify

      - name: Deploy
        uses: peaceiris/actions-gh-pages@v3
        if: github.ref == 'refs/heads/main'
        with:
          github_token: ${{ secrets.GITHUB_TOKEN }}
          publish_dir: ./public
Now, the local working copy is ready for prototyping!
Create a new post and view it locally to test Hugo and your new theme.
hugo new posts/HelloWorld.md
echo "Hello World!" >> posts/HelloWorld.md
hugo server -D
Pro-Tip: you can draft content in Google Docs, then use a Markdown converter extension called “Docs to Markdown”. Otherwise working from and IDE does the trick also.
Setting up a custom domain for Firebase project
- Create a Firebase project for the site
- Purchase an available domain, let’s say somenamehere.com/
- Add custom domain to Firebase hosting
- In Firebase project console, select Hosting from left nav menu
- Under the project domains, select “Add custom domains”
- Add an entry for www.somenamehere.com
- Add an entry for somenamehere.com, select “redirect to an existing website” and redirect to www.somenamehere.com
- Note the IP addresses assigned at these steps, as well as the record types (e.g. “A”)
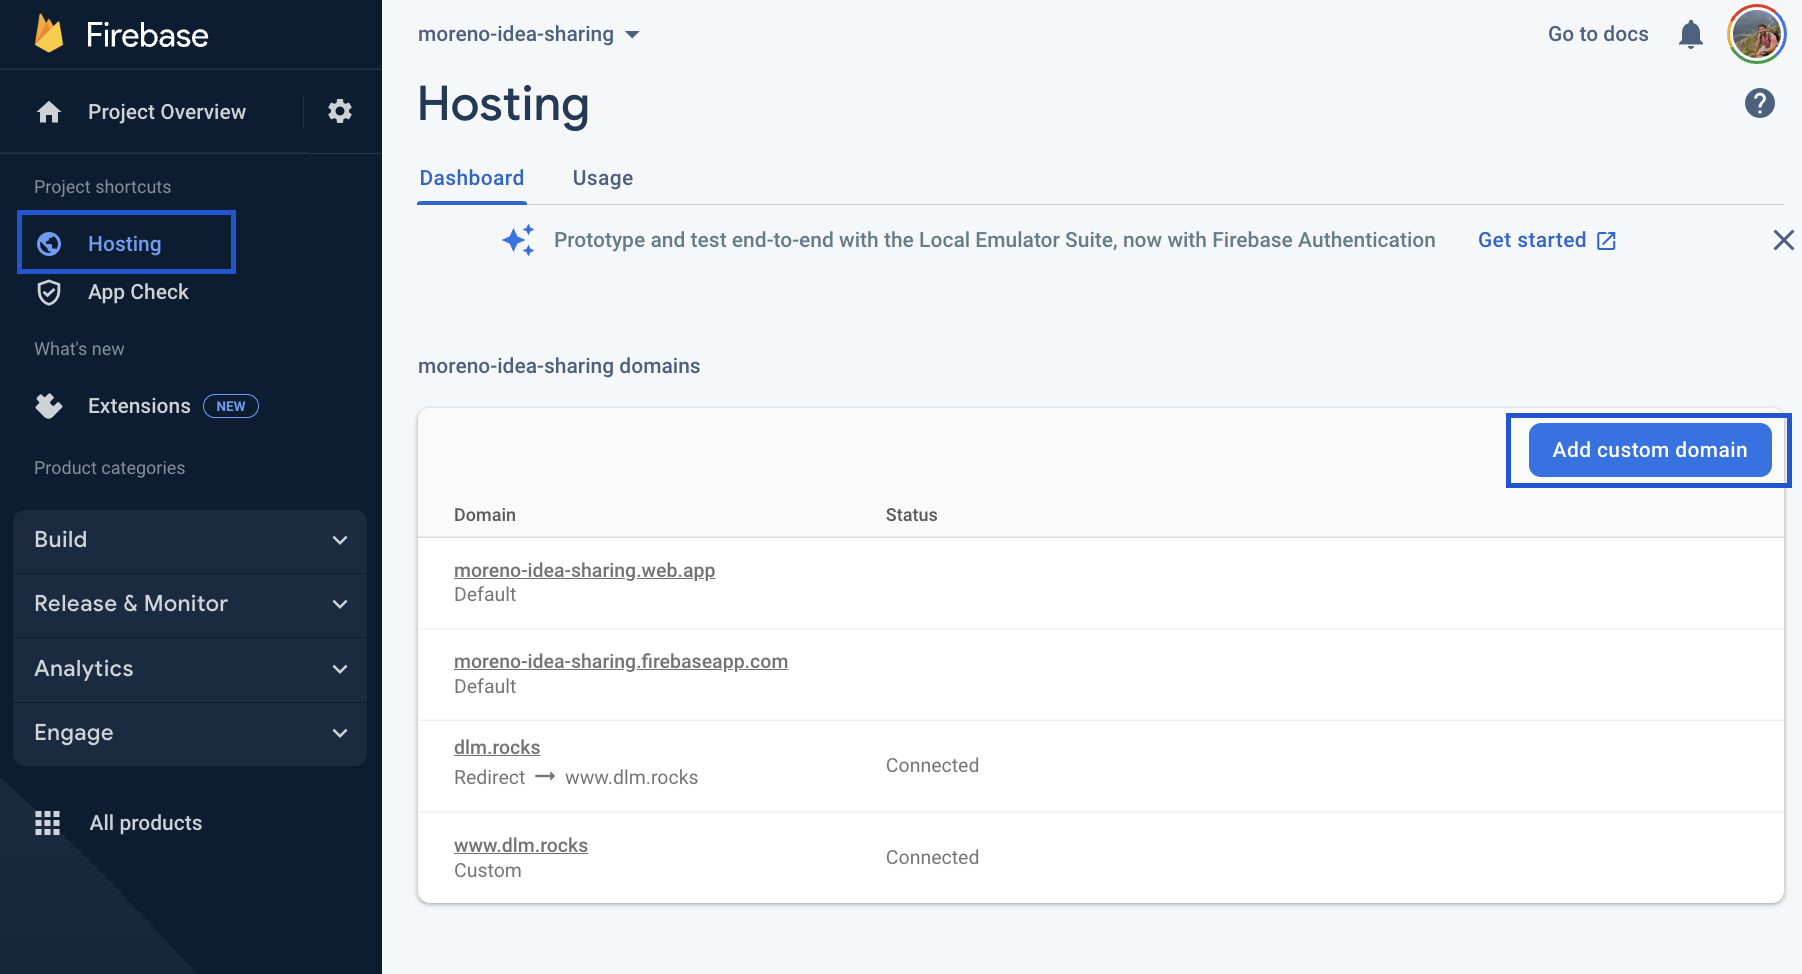
Firebase Hosting
Adding custom domain to Firebase hosting
- Register DNS, return to Google Domains
- From Google Domains console, select DNS from left nav menu
- Under “Custom Records” select “Manage custom records”
- Enter in the custom domain somenamehere.com and www.somenamehere.com here along with the noted IP addresses and the record types.
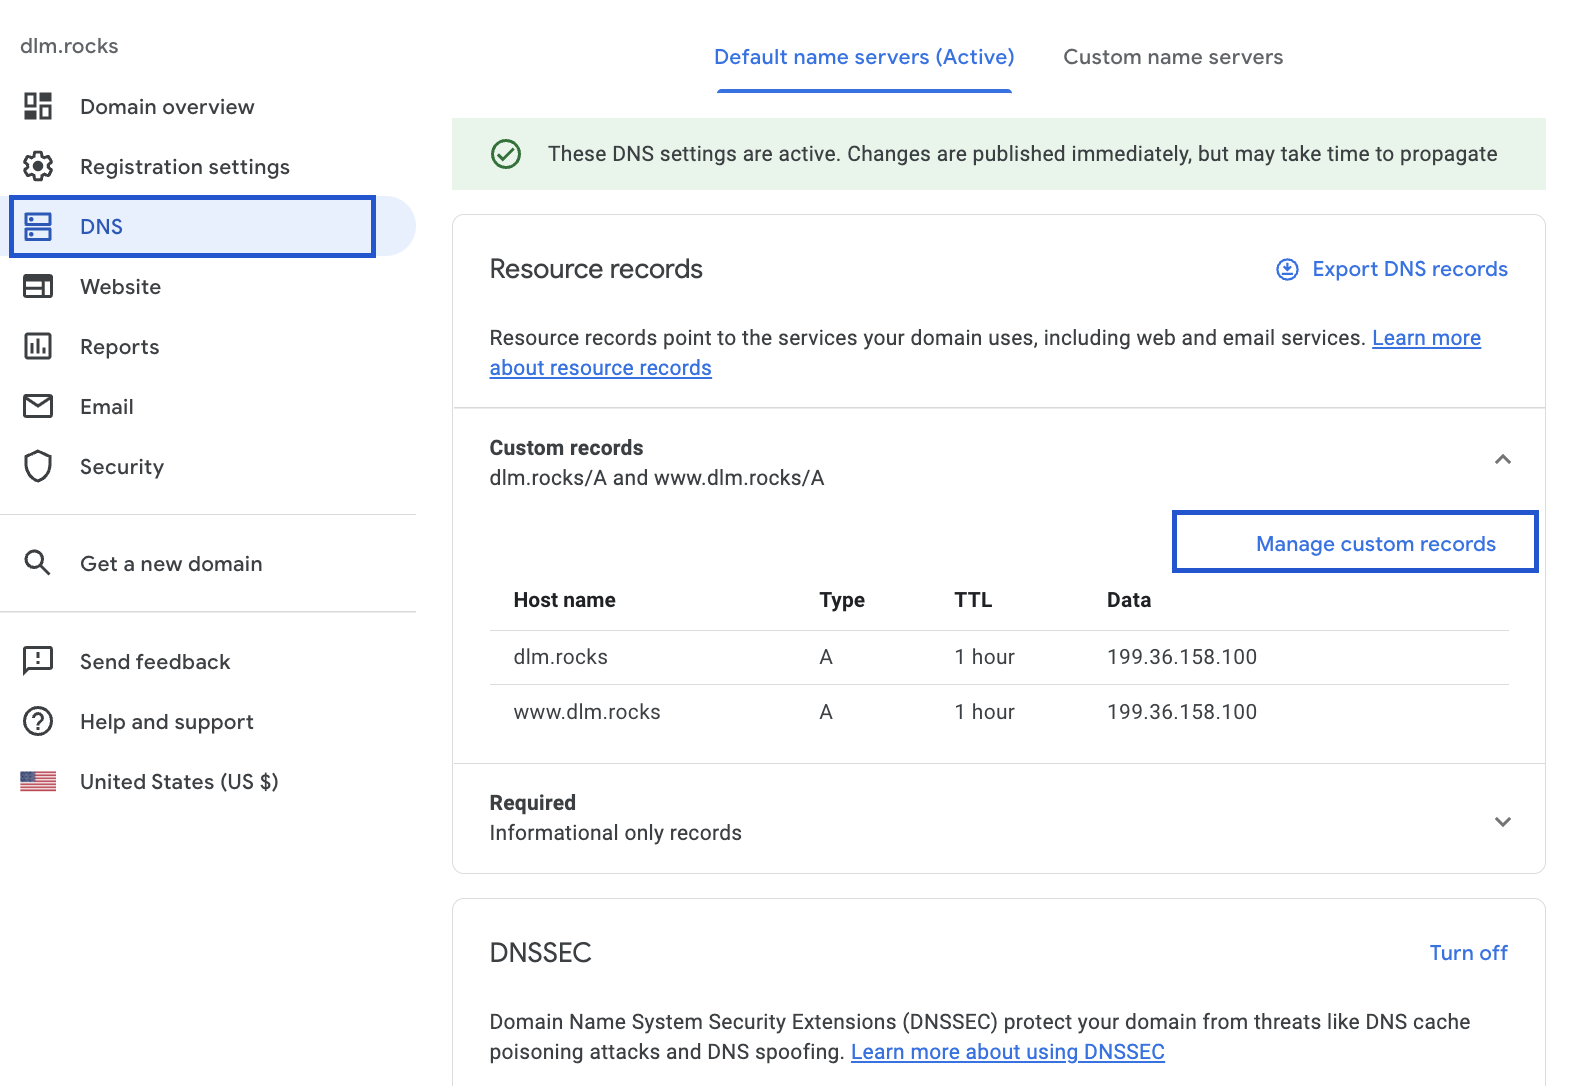
Google Domains
Updating DNS Register
Initializing Firebase and deploying the site
- Initialize Firebase at the root blog directory, in this example it’s been [username].github.io
npm install -g firebase-tools
firebase login # will be prompted for firebase login in browser
firebase init
In addition to the selections noted here,
- select gh-pages as the source for the site during setup
Now, the site can be deployed :rocket:
hugo && firebase deploy
Don’t forget to push your built site to Git :floppy_disk: